
By Britney Tran & Hien Bui
As hectic as the last few months have been, it’s always hard to believe we’re nearing the end of the year. But the holiday countdown slows for no one and in times of hardship, it can be difficult to transition into the proper giving and sharing mood. So whether you’re looking to get into the holiday spirit or for some last-minute Christmas gifts, here are some DIY, no-bake holiday treats for you and your sweet tooth!
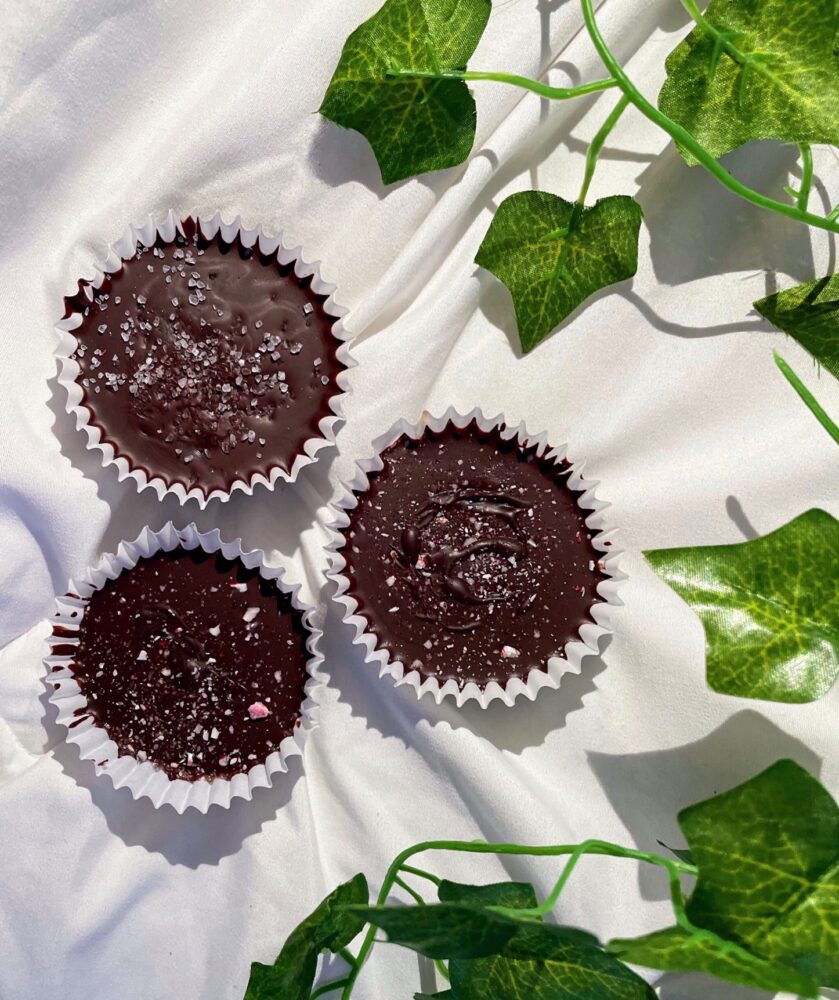
Chocolate Peppermint Cups
Ingredients:
- 2 tablespoons raw honey
- ¼ teaspoon peppermint extract
- 1 cup dark chocolate
- Peppermint candy or sea salt
Instructions:
- Place mini cupcake liners on a plate or mini cupcake pan and set aside.
- Use a spoon or hand masher to grind the peppermint candy into small peppermint bits or have a pinch of sea salt in hand. Then set aside.
- Place two tablespoons of raw honey and ¼ teaspoon of peppermint extract into a small bowl. Stir until evenly distributed and combined.
- Place one cup of dark chocolate in a microwave-safe bowl and microwave in 30-second increments, stirring in between each burst until completely melted.
- Fill the bottom of each mini cupcake liner with one teaspoon of melted chocolate. Add a small layer of raw honey in the center before placing another teaspoon of melted chocolate on top.
- Sprinkle the peppermint bits over the cups and freeze for about 30 minutes until firm. Then enjoy!
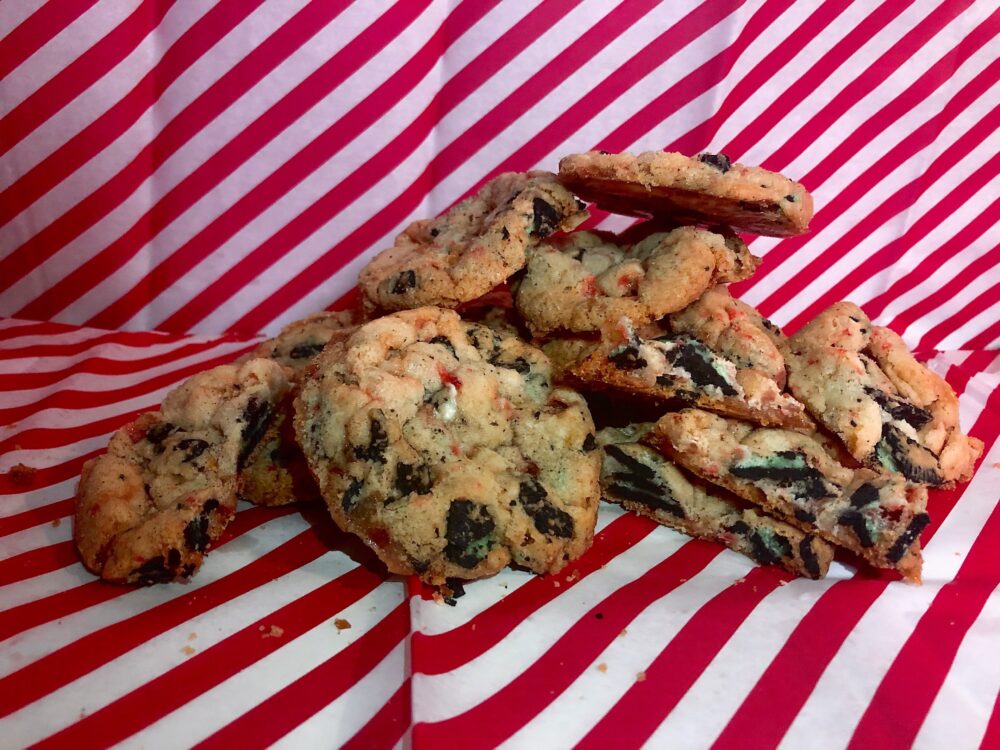
Oreo Peppermint Cookies
Ingredients:
- 1 package of sugar cookie dough (16 oz.)
- 1 cup of crushed peppermint candy
- ½ cup (14.3) of crushed Oreos
- 2 tsp of baking powder
Instructions:
- Prepare the oven and the cookie dough according to the package directions, adding the extra baking powder into the dough.
- Break the Oreos and peppermint candy into small pieces.
- Toss in the Oreos and peppermint candy with the dough and distribute to a greased tray.
- Bake according to the directions of the cookie dough.
- Let cool for 10 minutes before removing from the tray.
- Sprinkle peppermint ground to dust or red sprinkles over the cookies to complete the festive treat!
“Lumps of Coal” Cookies

Ingredients:
- 1.5 bags (14.3 oz) of Oreos
- 5 cups of large marshmallows (approx. 1 bag)
- 4 tablespoons of butter
Instructions:
- Line a baking tray/sheet with waxed paper and set aside.
- Place butter into a large pan over low to medium heat until melted.
- Add marshmallows and stir until combined with the butter. Wait until both are melted completely and set aside.
- Place Oreos in the work bowl of a food processor or hand masher and pulse until broken down into grounds.
- Add the Oreo grounds into the mixture of butter and marshmallows and stir until evenly coated.
- Wait for the mixture to cool. Then dampen hands by rinsing or dipping into cold water to keep the mixture from sticking. Grab about three tablespoons worth of the mixture and roll into a ball.
- Press the ball into a disc shape between your palms and set on the wax paper. Repeat the process for the number of desired cookies.
- Wait two to four hours for cookies to harden before packaging them into some holiday gift bags!
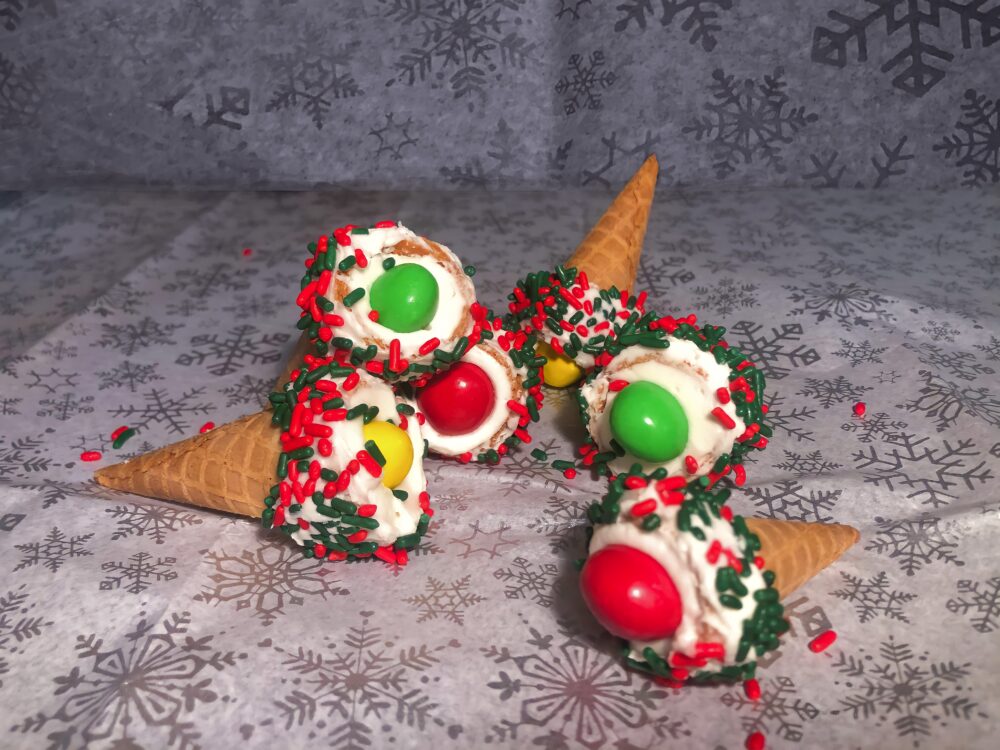
“Elf Hats”
Ingredients:
- 1 package of waffle cones
- Green sprinkles
- Red sprinkles
- A package of M&M’s
- ½ cup unsalted butter, softened
- 1 ½ teaspoons vanilla extract
- 2 cups confectioners’ sugar, sifted
- 2 tablespoons milk
Instructions:
- Cream room temperature butter using a hand mixer, stand mixer, or wooden spoon until smooth and fluffy.
- Add in the confectionery’s sugar gradually in installments, beating until fully incorporated.
- Add in the vanilla extract.
- Beat in the tablespoons of milk for three to four minutes.
- Set the frosting aside.
- Shorten the top of the waffle cones until they’re about an inch tall.
- Dip the rim of the waffle cones into the frosting until ⅓ of the cone is covered by it. Smear frosting inside the cone, stopping a few centimeters short of the rim.
- Dip the rim of the sugar cones into a mix of green and red sprinkles or drizzle sprinkles directly. Add an M&M inside and let the “elf hats” cool upright in the refrigerator for about an hour. Enjoy!
Christmas Cornflake Wreaths
Ingredients:
- 6 cups of Corn Flakes cereal (unfrosted)
- 3-4 drops of green food coloring
- 1 package M&M’s/any other red candy
- 8 tablespoons of butter
- 5-6 cups of mini marshmallows
- Parchment paper
Instructions:
- Add cornflakes into a large bowl and lay out parchment paper.
- Melt butter in a large saucepan over medium heat.
- Add in the marshmallows and stir until completely melted. Then, stir in food coloring.
- Pour cornflakes into the melted marshmallows, folding the mixture until the cereal is well coated.
- Grease hands with butter or baking spray.
- Dollop the cornflake-marshmallow mixture onto the parchment paper and shape each spoonful into a wreath shape while still warm.
- Let the wreath set for 10 minutes before pressing in the candy of choice, removing it from parchment paper, and enjoying the holidays with your festive treat fit for hanging over the mantelpiece.
Christmas Tree Krispies

Ingredients:
- 3 tablespoons of butter
- 10 oz. mini marshmallows
- White decorating icing
- Green food coloring
- 6 cups of Rice Krispies cereal
- Reese’s peanut butter cups
- Sprinkles of your choice
Instructions:
- Place butter into a pan over low to medium heat until melted.
- Slowly add marshmallows into the pan and stir until melted.
- Add drops of green food coloring in small increments. Stop once you’ve reached the desired shade.
- Remove from heat and add in Rice Krispies cereal. Fold the mixture until evenly coated and allow to cool for five to 10 minutes.
- Dampen hands by rinsing or dipping into cold water to keep the mixture from sticking. Grab ⅓ cup to ½ cup worth of the mixture and shape into cones by pressing firmly for a sustained shape.
- Decorate cones with sprinkles, using white icing to get them to stick to the cones. Then place Reese’s peanut butter cups under each cone for a complete Christmas tree look!
While this holiday season may seem a little unusual, these treats are sure to perk up the Yuletide spirit. Stay safe, stay inside, and enjoy the festivities, Barons!